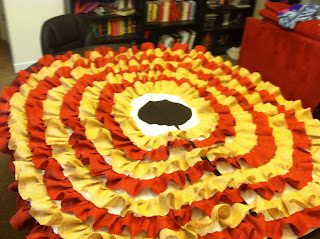
The Christmas Tree Skirt. Okay y'all, I'll be honest, I haven't posted in a while because I have been majorly procrastinating this! It is my first major tutorial and I really didn't want to screw it up, plus I will still owe you a picture of it with the tree. Anyways… my friend Tracy, one of the most amazing people ever, sent me a text one day with a picture of a tree skirt from Pinterest, and said let's make this! I was so in. I had actually seen it and was a little worried, but I figured if she was going for it I should too :).
The original post we found was here. This Vintage Grove blogger definitely inspired my colors and the starting method. The rest is honestly trial and error, part of it is finding the best method that works for you. Most people when doing this use a hot glue gun, I am way to accident prone to do that. I would seriously not even have any finger prints left if that was what I used. Instead I used Tacky Glue (a fantastic idea by the wonderful Tracy!). Still glue everywhere, but my digits all remain unharmed, which is the best part.
Okay let's get started! Materials needed:
 |
| Safety pin method |
Old tree skirt or 3 yards of fabric to make a square circle (mine's totally an oval…)
3 yards of one color burlap
3 yards of another color burlap
tacky glue
sharp scissors (I used my kitchen shears)
a safety pin
ruler
a lot of heavy objects (example: soup cans and rum)
The first part is cutting the strips. There is a really weird method to use the guy at Jo Ann's fabric showed me to get a perfectly straight line. Well not that weird, just a pain. Each strip is 3 inches, measure the first strip and use your safety pin to pull out a string. Be gentle! It will probably break, no biggie, just find where it stopped and start again. With that string missing there will be a perfect line to guide you to cut. Do this for most of the burlap, leave a little at the end to cut more if needed, I had extra, you might not. I am going to use the extra for a fun project! After a couple Christmas movies, phone calls, and dinner, all of my strips were cut!! Awkward picture of me is an example of what to do with all the little strings you pull out...
Next stop, keeping the dog from eating the burlap. Put it up high, trick him with a bone, anything. Mr. Louie was a pain in the rear end, especially on this next part. I got out the 3 yards of super cheap fabric that I used for my base. It was the most awful shape ever. So I cut from one side glued it to another, it's a huge oval, but I can overlap it in the back for a small area, or when I have a larger area next year I'll be able to spread it out. My mistake worked out!
Now the fun part that took forever, I am easily distracted. Gluing the thing together. Try not to make the pleats with the ruffles too tight. Just glue, bunch some, and put something heavy on top. Keep going until you lose your mind. It's really not that bad. My kitchen table extends so I just opened it up and went to town. The hardest part is waiting for it to dry. Once you have made a little distance on one row, start on another, that way you can have multiple spots drying. At one time, I had four going, that way when I finished all of them the first one I had done was dry and ready to go!
More pictures of the process!!
 |
| After string is pulled straight line to cut |
 |
| First 2 rows |
 |
| Four rows in, using objects to hold down |
 |
| Almost done... |
 |
| Done!! |
Happy Crafting!


